
")
(Warning:Keith is not a real expert, he's just the guy with the website and too much time on his hands, so don't take anything he says as gospel.)
I received this e-mail from Bill Grogan. It is fairly detailed, so I have made a summary at the bottom.
Bill's method does not leave room for the Volume Control. See my comments at the bottom.
The instructions below are specifically for a JT-30, Blues Blaster, CAD-50,
etc., but with slight modifications, will also do the trick on Shure Green
Bullets too. Don't be offended by my "childproof" instructions, especially
if you're "electrically handy", the instructions that follow are meant for
total dolts (like me ;-). To begin, you'll obviously need one or more 1/4"
jacks (depending on how many mics you're gonna "operate" on ;-), which are
readily available at most electronic shops. But, make certain that you
purchase only 2-prong jacks, stay away from 3-4 prong models, which may
cause buzzing/humming, etc. I'm also assuming you've got a small soldering
iron (not a gun preferably, they get too hot and might damage wires, etc.),
a bit of solder, screwdriver(s), a drill and perhaps a grinding/sanding
tool, etc., and if so, you're good to go.The first thing to do is remove the XLR connector in your JT-30, which
is epoxied in and will need to placed in a vise to work it loose, unless
you're exceedingly strong. Grab the mic shell and twist it back and forth
until it loosens, even slightly. If you can't work it loose, wrap the mic
shell in a rag or towel and put it in the vise, then grab the XLR connector
with a pair of vise-grip (locking) pliers and work it loose. It is attached
to the crystal, etc. inside by 2 wires, red & white, so once you've got
the XLR connector loose, cut these 2 wires off as close as possible to the
XLR connector body and set that aside or toss it. Next, remove either the
brass locking ring on the external stem of the vol. pot, or the 2 side screws
on the grille of the mic, both will need to be removed to work inside the
shell. Now, inside the mic, unsolder the vol. pot wires to the crystal
and remove the pot. Obviously this is not necessary if your mic doesn't
have a Vol. control, and if so, read on.Here's the hardest part of this mod IMO, and perhaps the most time consuming,
depending on tools available, but a little patience is required too. Notice
that the ground wire is screwed into a small hole on the opposite side (inside)
of the opening that held the XLR connector, remove this screw. The little
hole that held the ground wire screw now MUST be enlarged enough to accept
the threaded portion of the 1/4" jack. Begin enlarging this hole with a
1/8" drill bit and working up to 1/4", checking the vol. pot with each size
increase just in case you forget to look at the drill size to make sure
that you don't make a hole that is TOO LARGE. I think the final hole is
about 3/8" in diameter (check the diameter of the threaded female stem of
the jack to ensure this), and I finished mine with a rat-tailed file. Doesn't
matter if you knick off paint from the metal inside of this plug hole as
it's gonna be covered up anyway. You'll note that when you can insert the
1/4" jack thru the inside of the shell and thru the hole you've enlarged,
that it's a tight fit, and there's precious little room to screw on the
2 thin retaining nuts. Again, not a problem, or rather, not a problem if
you've centered the hole, or nearly so, so best to make sure that you can
screw on one of the 2 retaining nuts. If you can, you're centered well
enough, but don't install these nuts just yet.My next advice is to
solder the red & white wires from the crystal to the 2 prongs on the jack,
and connect the ground wire to the shell, which can be done by one of two
ways. Some techies may cringe, but I just ground off a small section on
the inside of the shell on the right side looking in from the front opening,
at about jack level, and soldered the ground wire to the mic shell itself.
Or, if you want to make a more secure ground attachment, you can drill out
a small hole in one of the 3 raised circular bosses on the inside of the
shell towards the bullet tip, then you can either tap it or install a self-tapping
screw attached to the ground wire. Your choice. Anyway, you MUSTground
the crystal to the mic shell, or "that sucker's gonna hum!".Almost done now, all that's left is to solder the red & white wires to
the prongs on the jack, tighten up the locking screws, etc. OK, I originally
soldered the wires on my mic backwards on the jack prongs, and you'll know
if you do when done if no noise comes out of the mic/amp! I really can't
remember which wire goes where (sorry, lost my memory), but I ?think the
red (hot) lead goes to the center prong. Try that, and reverse solder them
if not, an easy 5 min. face saving job ;-), but make sure that the mic works
BEFORE you lock it all up tightly. So, after you've convinced yourself "hey,
this thing really works", begin to carefully thread on 1 of the locking
nuts onto the threaded stem of the external part of the jack, with your
finger tips, if they're small enough, if not look around for a small child
;-). Once on and making sure that it's not cross threaded, with the aid
of slender flat screwdriver slowly screw on the nut until you can't tighten
it any more by holding onto the internal part of the jack inside the shell
and wiggling it back and forth to get all the play out and ensure a snug
lock, etc. Now, install the 2nd lock nut in the same manner, which, when
snugged down, acts as a rlocknut/retainer (hint, mine haven't fallen out
yet). Put the front grille back on, plug it into your amp and make some
noise. One final note, yeah, you're now gonna have small hole in your JT-30
where the vol. pot was installed. Big deal, you can either leave alone
(open) as I did, or fill it with taffy/chewing gum/body putty, etc. Not
necessary IMO, and who knows?, that wee hole might let just enough noise
escape, to prevent your mic from exploding from the awesome sounds you're
now gonna make!Good luck,
Bill Grogan
In summary:
WARNING! This can damage the mic. Be very careful. The metal of the shell is very soft and will break and scratch easily so don't use a wrench or vise on the mic itself. Don't put the shell in the vise (as described above) unless you are willing to risk crushing it. Since you are replacing the XLR part of the mic, don't hesitate to destroy that part as you take the mic apart.
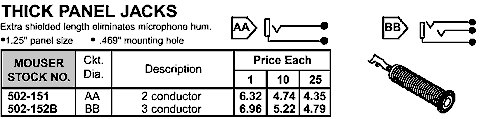
Needed: Vise Grips, Soldering iron. Short lengths of wire (#20 stranded is good, but any "bell" type wire is fine.) Strong Friend. 1/4 inch mono telephone female jack (guitar jack). Available at Radio Shack or Mouser.com. I use the long ones (thick panel) which have about 1-1/4 inch of thread.
The method above removes the Volume Control. Most 1/4 inch panel jacks are too wide to fit both the jack and the volume control in the same mic. I use a "Thick Panel" Jack (see the Mouser.com catalog page. Part Number 502-151). This should solve the problem.
Note: I haven't tried this. I don't endorse it. The XLR is not that much of a problem. This is for the terminal tinkerer. Let me know how it works out.
1) Take apart the JT-30. Unsolder the element before you begin. Unsolder the volume pot and take it out by unscrewing the ring nut on the outside of the mic.
2) Put the XLR part of the mic in a vise and get your strongest friend to rip it out. The XLR connector is epoxied in place so it should come out with a little elbow grease. Don't mess up the mic! Rotate the connection, don't bend it.
3) Unscrew the ground wire that went from the XLR to the inside of the mic. Remove the screw. This screw hole is the starter screw for the guitar jack. Measure your jack. The ones I have require a 15/32 hole, but I use a 1/2 inch drill bit so it slips in easy. Your jack may be the 3/8 variety. I use a variable hole cutter which is a neat little cone shaped drill bit that will cut bigger and bigger holes up to 1/2 inch. This is easier to use than a straight 1/2 inch bit.
4) Solder two 4 inch wires to the jack and put it in the mic. Screw it down tight. Solder three 4 inch wires to the pot and put it back in place. Wire up the element according to the Piazza wiring diagram (on this site, with or without the magic capacitor). Tape any exposed wire to wire connections. Shrink tubing is better for this, if you have any. (I make a plastic doughnut out of scrap plastic to put around the pot so that the exposed connections don't touch the body of the mic.)
5) Try it out to see if it works before you screw the cover back on. I am superstitious about this. If you screw the cover back on, the mic won't work, but if you try it first, it will work just fine.
Someday I'll get some pictures of this process. I don't own an XLR version of the JT-30, but when I get one, I will convert it.